Friday, April 24, 2009

Elmo Steals Dr. Evil's Pizza (Made by Me - Mrs. Stovall)

THIS IS AN ADVANCED LESSON THAT ONLY THE BRAVE SHOULD TAKE ON (However, it does count as a grade, so you best be brave)
(This lesson is still underconstruction)

You too can make Elmo grab the Pizza from Dr. Evil?
In Flash, you'll need three separate layers for: 1) Elmo Alnoe; 2) The Pizza alona; 3)Elmo with the Pizza. You can do this exercise with your own mosaic; just have one of your objects steal another of your objects right in front of some of your other objects.

but first...
Combine Elmo with the Pizza in Photoshop before you import your photoshop file to Flash:
(I combined the two objects in Flash, but it is more easily done in Photoshop)
1) Select the Pizza Layer> Create a new layer from copy (do the same to Elmo's layer)
2) Select both copied layers (click on one then hold down your shift key to select the other)
3) Right click and chose merge selected layers
4) Select Elmo using the square selection tool
5) From the Edit menu, chose Free Transform - this lets you move Elmo to the Pizza. It also lets you rotate Elmo and if you right click on Elmo in the transformation state you have other choices such as flipping him horizontally. When you are done transforming Elmo, hit on your keyboard to take him out of the transformation state. You can free transform the pizza as well to make it Elmo's holding the pizza convincing.


This is my Flash screen that made this short animation.


Imported everything directly to the stage. Remember from our first Flash Lesson, that when we Import, an Import Selection Box opens for you to choose which objects you want. I unchecked only a few object layers that I didn't want. So a layer was made for each object that I selected.

Similair to Photoshop, there is an eyeball collumn for each layer; click on the dot in the eyeball collumn on a layer to see the dot change to a red X and the object hides from view (it is still there, you just cant see it). This allowed me to see what was on a layer and determine what I wanted to name it. Notice that I have named each layer to identify the object that is on that layer. Just right click on the layer> choose Properties and rename the layer to something that indicates what the layer contains.


Notice that the frames are different lengths. The layers with frames running the longest along the timeline are those objects that are left at the end of the animation - Dr. Evil, Mini Me, the table and the flowers. By the end of the animation, Elmo has already gotten away with the pizza in the car, so those timelines are much shorter.

When you first Imported to Stage, each layer has only one frame. Drag the playhead to the right, and watch all the objects dissapear. This is because none of the layers extend past the 1 mark on the timeline. I had to click on the one frame in each layer and drag it to where I wanted it to end. I kept adjust the length of each frame until it was the right length.


Back to what I did in Flash


The Elmo Alone layer are the same length. Notice that the Elmo Alone layer is a different color of blue. This indicates that I draged Elmo from the Library to the stage then right clicked on him to select Create Motion Tween. This added 24 frames to my timeline on that layer and moved the playhead to the 25 position on the timeline (the end of the frame). I then dragged Elmo to a position just above the pizza then on to the car. I also grabbed Elmo's Motion Path in the middle and made it arc down so it looks like he is swooping down.

Thursday, April 23, 2009

Flash Animation Lesson 1

1) Open your email (yahoo) and locate the email that you sent to yourself with the mosaic.psd
file attached.


2) Right click on the attachment and save it to your desktop.

3) Open Adobe Flash


4) Once Flash is open, you will see the welcome screen with many options. Choose Create New Flash File (Action Script 3.0)


5) Once in the empty flash file, choose Import to Library.


6) Navigate to your mosaic.psd on your desktop.


7) An Import to Library dialogue box opens. Put a check next to all of the Photoshop layers that you want to use in your animation and click OK.


8) In the lower right quadrant of your screen, click on the Library Panel tab, which reveals the Library Panel that was hidden behind the Properties Panel.


9) In the Library Panel, click the arrow next to your mosaic.psd file folder to reveal the layers.


10) Click on each layer and you will be able to view the object in the small screen at the top of the Library Panel.

11) Note that your Playhead is at position 1 on your Time Line and that your stage is blank.

* Note: The Zoom box in the upper right corner above the stage. This allows you to zoom in or out on the stage.

12) Which ever object or objectS that you want to the stage.


13) Right click on the object that you want to give motion to (animate) and choose Create Motion Tween and click OK.


14) Notice that Flash has added a second layer and has made it 23 keyframes long so that the animation will last for 24 frames. You can stretch this out further if you would like to lengthen your animation.


15) With the Playhead in the 24 position on the timeline, drag the object to be animated to the point that you want the object to stop.


16) This dotted line is your Motion Path. You can change the path by click and dragging from any point on the line.


17) Slide the playhead back and forth to see the object move along the Motion Path.
18) Notice that it is not until you move the playhead back to the first keyframe on the timeline that you see your other objects. This is because the layer that contains those objects is only one frame long. You have to highlight (click and drag to turn blue) the keyframes on that layer all the way to the point on the timeline that it ends, which is position 24. Right Click on these highlighted frames and choose Convert to Keyframes. Now move the playhead back and forth along the timeline to see that all of your objects are on your stage throughout the animation.
If your animated object's motion path takes it behind your other objects and you want the animated object to move infront of the other objects, then your must drag your animated layer to be the top layer on the timeline.
18) Now that you have completed your animation, click File> Export> Export Movie and choose file type Quick Time (.mov)
19) Upload the .mov file to your blog by clicking the movie upload button in a new post.

Wednesday, April 15, 2009

Soundbooth Lesson Part 1

***********************************************************************************
Assignment: Record yourself reciting a poem or anything you want, no profanity.
***********************************************************************************

Lesson is due this Friday April 16th and will be counted toward this six weeks grade.
______________________________________________
*********************************************************
LESSON OBJECTIVES
**********************************************************
___________________________________________
Students will learn how to
· Correctly use the microphone
· Create a new wave file
· Selection a portion of their wave file
· Stretch their wave file out to capture exactly the portion the desire
· Save a portion of their wave file as a new file
· Save the wave file into a multi-layer file
· Save the multi-track file (note the file type is .asnd)
· Insert new layers
· Pull the new portion file onto other tracks multiple times
· Apply sound effects to wave files on various tracks
· Shorten a wave file
· Play their file
· Save their file in a file format that can be uploaded to their blog or to a project file that they email to themselves if they intend to work on it further.


The Microphone
Put the mic one inch below your chin,
this keeps you from wearing out the mic’s diaphragm (don’t sneeze into mic)
If the mic is too close to your chin, you will pick up swallowing sounds
Don’t speak loudly with your mic, it is very sensitive


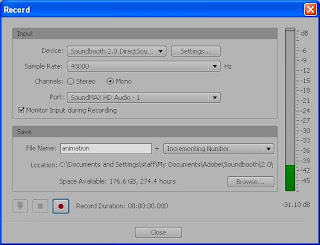
Open the record dialogue box


Talk softly into the mic and you will probably still see the sound level gague go into the red area. We do not want the recording to ever go into the red area. It is best if you don't go above the 12 decibel (db) mark. If you record in the 6 db range or above, you will here noise through out your recording.


Change the audio setting s to ensure a smooth sound

Click the volume icon in the bottom right corner of your screen.


Bullet Recording and click OK


Move the Microphone and Stereo Mix sliders down until the sound level stays in the desire range when you speak.
Please take note of the following
Click the record button on the record dialogue box. When you are done recording, click the square, then click the close button.


Your screen will look like this.

Both the green waves on top and the purple and orange below are different views of your recording. For right now, we are only going to work with the top green waves.


Drag the bar between the two layers down so that you only see the green waves.


Stretch your sound waves out


Select a portion of the wave to edit


After selecting section, right click and Choose save selection as. Leave the settings on default. Click OK.

Now your selection is saved as its own file.


Drag your new selection recording and drag it to Audio 2. Do this over and over.


Now click on the light blue line that goes across each wave file. Clicking on the blue line creates a yellow dot. These yellow dots can be use to drage the volume up and down.

Soundbooth Lesson Part 2 - Shortening a Wave File and Adding Effects

Place your cursor at either edge of a wave file and it will turn into this red and black marker that allows you to drag and shorten the file.


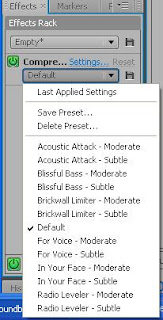
To Add an effect click on your wave file that you want to add the effect to; Click on effect on the menu bar and choose an effect that you want to try. All effects are useful. Mastering is the most comon effect. Phaser makes it sound more dramatic sci fi.


Click on the down arrow to see all of the effects that you can ad to the selcted wave file. The effect will be applied to the entire wave file.


Click to play the modified file. If you don't like the effect that you added, click edit> undo . You can add up to 5 effects on one wave file.


Soundbooth Lesson Part 3 - Saving your file

To save your project with all of the wave files combined, click on the multitrack, then click file>save


Save files as type wmv or wma is most common; quicktime is for podcast
While it is a .asnd file, you can still modify it. Once you save it as a different file type, you can’t edit it. To upload the file to your blog, you need to save it as a Windows Media File WMV. This brings open the export dialogue box. Click on the Preset drop down menu to see the many formats for saving your file.


Choose NTSC to Download 512 bps

Monday, April 13, 2009

Further Soundbooth Training

Because I just had a class in Soundbooth this weekend, we are going to delve farther into it this week.

I will demonstration and lead the class to:
Students will create a sound file
Copy the recording and lay it down multiple times on separate layers.
Modify the sound clips so that can make breaks in the dialogue.
Import and place music and other sound clips in the dialogue breaks.
Adjust the sound level to include fade ins and fade outs and use the volume to create dramatic effects.