Assignment: Record yourself reciting a poem or anything you want, no profanity.
***********************************************************************************
Lesson is due this Friday April 16th and will be counted toward this six weeks grade.
______________________________________________
*********************************************************
LESSON OBJECTIVES
**********************************************************
___________________________________________
Students will learn how to
· Correctly use the microphone
· Create a new wave file
· Selection a portion of their wave file
· Stretch their wave file out to capture exactly the portion the desire
· Save a portion of their wave file as a new file
· Save the wave file into a multi-layer file
· Save the multi-track file (note the file type is .asnd)
· Insert new layers
· Pull the new portion file onto other tracks multiple times
· Apply sound effects to wave files on various tracks
· Shorten a wave file
· Play their file
· Save their file in a file format that can be uploaded to their blog or to a project file that they email to themselves if they intend to work on it further.
The Microphone
Put the mic one inch below your chin,
this keeps you from wearing out the mic’s diaphragm (don’t sneeze into mic)
If the mic is too close to your chin, you will pick up swallowing sounds
Don’t speak loudly with your mic, it is very sensitive
Open the record dialogue box


Talk softly into the mic and you will probably still see the sound level gague go into the red area. We do not want the recording to ever go into the red area. It is best if you don't go above the 12 decibel (db) mark. If you record in the 6 db range or above, you will here noise through out your recording.
Change the audio setting s to ensure a smooth sound
Click the volume icon in the bottom right corner of your screen.


Bullet Recording and click OK

Move the Microphone and Stereo Mix sliders down until the sound level stays in the desire range when you speak.
Please take note of the following

Click the record button on the record dialogue box. When you are done recording, click the square, then click the close button.
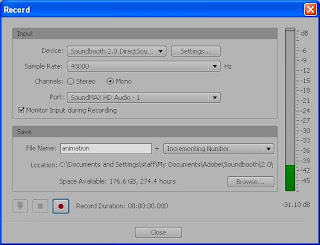

Your screen will look like this.
Both the green waves on top and the purple and orange below are different views of your recording. For right now, we are only going to work with the top green waves.
 Drag the bar between the two layers down so that you only see the green waves.
Stretch your sound waves out

Select a portion of the wave to edit


After selecting section, right click and Choose save selection as. Leave the settings on default. Click OK.
 Now your selection is saved as its own file.
 Drag your new selection recording and drag it to Audio 2. Do this over
  and over.
Now click on the light blue line that goes across each wave file. Clicking on the blue line creates a yellow dot. These yellow dots can be use to drage the volume up and down.

No comments:
Post a Comment